Have you ever wanted a USB device that does more than just blink? What if your microcontroller could act like a keyboard, launch programs on your PC, and display status with built-in RGB lighting—all from a tiny board the size of a thumb drive?
In this article, we’ll walk through a fun and practical project using the Waveshare RP2040 Tiny USB-C development board to build a configurable USB HID launcher with LED feedback. This device can automatically launch commands (like URLs in kiosk mode), supports randomized intervals and run-once behavior, and uses its built-in RGB LED to visually indicate its status.
🛠 What You’ll Need
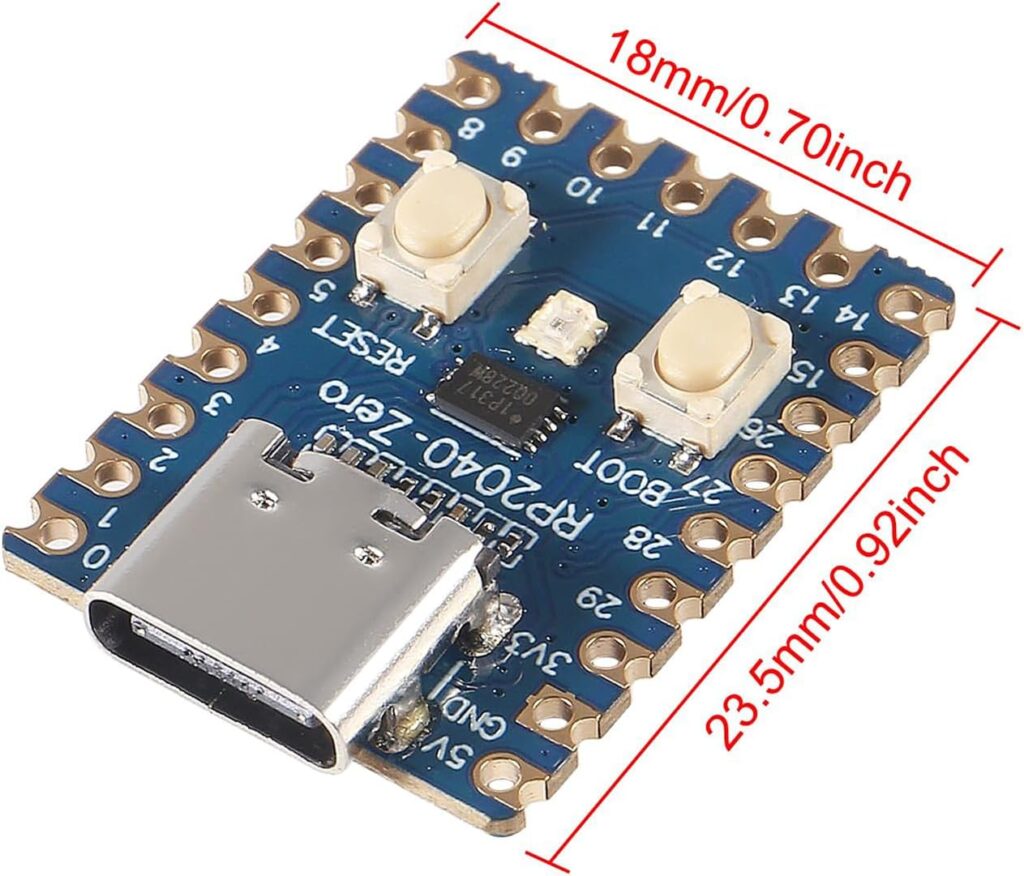
- Waveshare RP2040 Tiny USB-C board
A compact RP2040 board with built-in RGB LED and USB-C connector. Lightweight and ideal for HID projects. Available on Amazon:- Single unit: great for prototyping
- 6-pack: cost-effective option at around $17
(Useful if you want several devices for demos or different use cases.)
https://www.amazon.com/Microcontroller-Development-Equipped-Processor-unsoldered/dp/B0DXL12W59
[No Affiliate or Sponsor]
🚀 What This Project Does
This microcontroller becomes a USB keyboard device. When plugged into a Windows PC it can:
- Press Win + R to open the Run dialog
- Type a configurable command (like launching a browser in kiosk mode)
- Press Enter to execute
- Wait a configurable amount of time between runs
- Show LED animations to indicate:
- Waiting period
- Execution
- Idle state
All behavior is set via a simple config.txt, editable on the board’s CIRCUITPY drive.
⚙️ Key Features
✅ Configurable Launch Behavior
Your config.txt controls:
- COMMAND – what gets typed and executed
- RUN_DELAY – delay before the first run
- MIN_DELAY / MAX_DELAY – random interval range between runs
- RUN_ONCE – whether to do it just one time or loop indefinitely
💡 LED Status Indicator
The integrated RGB LED is not just for show. You get:
- Off – no activity
- Solid – fixed color
- Blink – on/off in a chosen color
- Breath – smooth fade in/out
- Rainbow – continuous color cycling
- Rainbow Blink – blink while cycling colors
You can also control:
- LED_COLOR – your base color (e.g., RED, BLUE, CYAN)
- LED_SPEED – how fast animations run
- LED_BRIGHTNESS – brightness level
All of this is controlled through the same config.txt file, which the board re-reads every few seconds so you can tweak behavior without reflashing.
🧠 How It Works
At startup:
- RP2040 enumerates as a HID keyboard
- It reads the config file
- The LED starts animating based on settings
- It waits for the PC to recognize the keyboard
- After an initial delay (if configured), it sends the hotkey combo (
Win + R) - Types your command
- Presses Enter
- Waits a randomized interval (or just once if configured)
- Repeats
All the while, the LED visually communicates what’s happening.
📁 What Goes on the CIRCUITPY Drive
CIRCUITPY/
│
├── code.py          # Main program
├── config.txt       # User settings
└── lib/             # Required libraries
    ├── neopixel.mpy
    ├── adafruit_led_animation/
    └── adafruit_hid/
config.txt is structured like this:
COMMAND=msedge --kiosk https://example.com --edge-kiosk-type=fullscreen

RUN_DELAY=10       # Initial delay
MIN_DELAY=30       # After first run
MAX_DELAY=120
RUN_ONCE=false

LED_MODE=Rainbow Blink
LED_COLOR=GREEN
LED_SPEED=150
LED_BRIGHTNESS=255
💻 Why It’s Useful
- Kiosk automation – automatically launch and cycle through URLs
- Testing workflows – automate app launch or command execution
- Indicator device – quick visual cues for task state
- HID emulation projects – explore creative automation
🧫 Extending the Project
Here are some ideas you might consider:
- Add a small OLED to show status text
- Build a web interface to edit config via Wi-Fi
- Add buttons to cycle commands manually
- Store multiple commands and rotate through them
- Add sound feedback
🧾 Final Thoughts
This project shows how powerful a tiny board can be when paired with thoughtful software design. Instead of just blinking, your Waveshare RP2040 Tiny USB-C board becomes a fully programmable automation tool with real-time feedback from its RGB LED.
Want to see more projects like this? Check out ConsultingJoe.com for tutorials, hacks, and real-world automation tips.